Virtual Dub
Introduction
This guide does not cover capturing with Virtual Dub. It covers the basic Virtual Dub 2 editing and export process from
start to finish. The program is quite capable but I will only touch on the basics here.
What Is It?
Virtual Dub is a video capture and editing program. It contains GUI-based video manipulation functions through it’s use
of filters and plugins, some of which come with the program, and hundreds of others than can easily be added. VDub
can open AVISynth scripts for further processing. VDub is free. This version, VDub2, is a variant of the original VDub
and contains some additional user-friendly options such as simplified cropping, compatibility with many more file types
and H264/MP4 export.
For me, it has fallen out of favour as a capture program because it is too fiddly and unreliable, but as an editor, it is a
critical part of my workflow, as I use it to produce high-quality deinterlaced and filtered AVIs which I then import into my
“proper” video editor for final editing and export.
Virtual Dub will also open AVISynth scripts and with VDub2 you edit the scripts “on the run” and show the results
immediately.
Installation
VDub doesn’t “ install”, per se. It’s known as a “portable” program, meaning that it runs in it’s own folder, which can be
placed/located anywhere on your computer, and which can be moved after setup/unzipping.
This tute is based on Virtual Dub 2. Download the ZIP file from here:
https://www.videohelp.com/software/VirtualDub2
Save the ZIP file to whatever location you like.
On the ZIP file, right-click, choose “Extract All…” and click on “Extract”. The VDub2 folder will be created inside the
folder you downloaded the ZIP file to. You can move the folder as desired.
Setup
VDub has two versions: the 32bit version and the 64bit version. The 32bit version has quite a number of filters available
that haven’t been adapted for 64bit, such as Flaxen’s VHS filter, an outstanding 32bit filter that can shift bleeding
colours in old VHS video, especially reds. The downside of VDub 32bit is that it is memory-limited and if you have it
doing a lot, it might run out of memory and crash. I have had this occur when running AVISynth scripts but not
otherwise. For basic operations, 32bit is OK.
As far as 32/64bit computers go, I don’t know whether the 64bit version of VDub will run on 32bit Windows, but the
32bit VDub will definitely run on 64bit Windows.
This is the VDub2 folder:
The two plugins folders contain the plugins and filters. Third-party plugins and filters can be simply dropped into the
appropriate plugins folder and will be available in the filters list when the program is next started.
Note: 32bit filters will not work in the 64bit version, and vice versa, and won’t be visible in the filter list.
Start the program by double-clicking on the appropriate EXE file; let’s start with the 32bit version, VirtualDub.exe. You
can tell which version you have open by looking at Help>About. The 32bit version says “Compiled for … 2008 for X86”
and the 64bit version says “Compiled for … 2008 for AMD64”.
Once started, open a file; preferably an Interlaced AVI such as a capture from a tape of some kind so you can see the
effect of the deinterlacing.
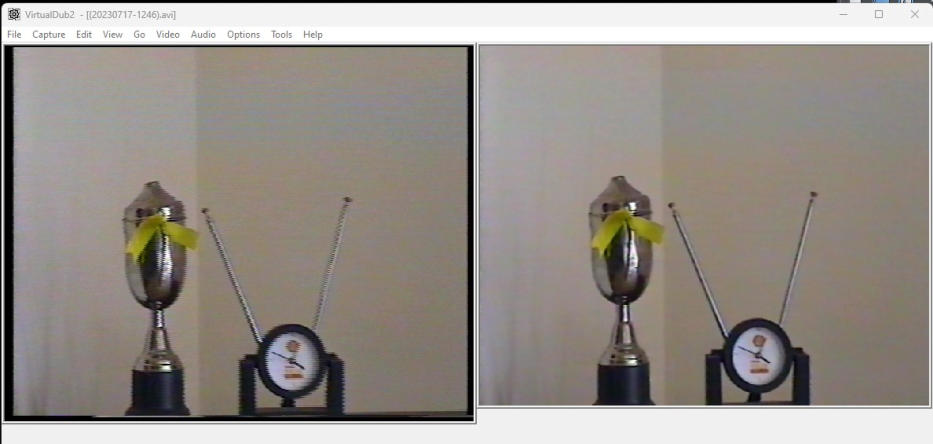
Set up the View (menu) arrangement so you have both panes visible and autosized.
The left pane is the source video. The right pane is the processed video after the filters have been applied.
AVISynth Scripts-Opening
For those of you using AVISynth, Virtual Dub 2 is a great way to open and edit AVISynth scripts (AVS files). Simply
open the AVS with the File>Open Video file…command.
To edit your script, use Tools>Script Editor. This will open your script, allow editing, and then you can run your script
again immediately using F5 or on the script editor menu, File>Save and refresh.
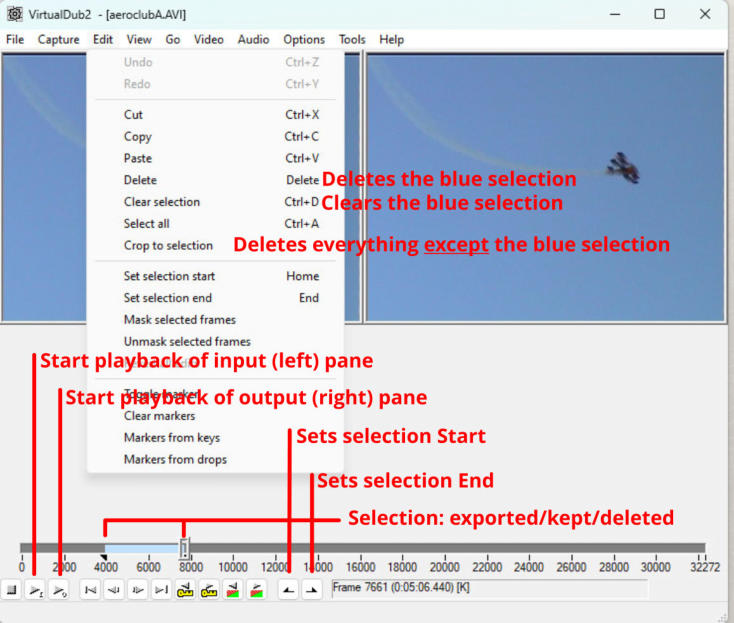
Timeline Editing-The Basics
While not a fully-fledged non-linear video editor, VDub has good editing capabilities such as trimming and deleting
sections of a video. Basic functions of the timeline controls:
To export or “Save As” just a portion of the file, create the blue selection, then File>Save Video.
Here is a short video on using the timeline editing functions. I made this in a rush for a poster on VideoHelp so I
apologise for the “roughness”.
Lossless Editing
If you merely want to losslessly edit your video files after capture, for example to cut away unwanted sections without
actually doing any restoration and then save as lossless, edit as described above, then proceed down to the Lossless
Saving section below.
Using the Filters
Setup
Ensure “Full Processing Mode” is selected (Video>Full Processing Mode). Video cannot be modified in Direct Stream
Copy mode.
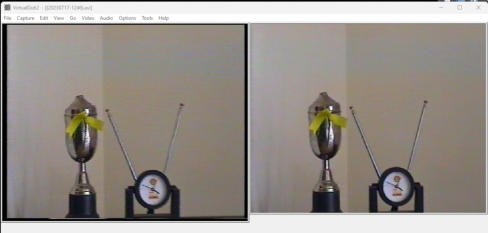
The effects of any filters will be displayed in the right pane as soon as you hit OK on the main filter screen. This allows
you to compare the pre-processed video in the left pane with the post-processed video in the right pane. When you do
a “Save Video…” or other export function, the exported video will be the same as that in the right pane.
Deinterlacing
Let’s do a deinterlace and a bit of noise reduction. Analogue AVIs such as a VHS capture are interlaced, meaning two
fields per frame. This is displayed as jagged edges on moving objects. This is quite normal and is removed by the
process of “deinterlacing”.
Deinterlacing should not be applied to a “progressive” file such as an MP4 from a phone.
Deinterlacing should be the first filter used (if you are going to use it, that is).
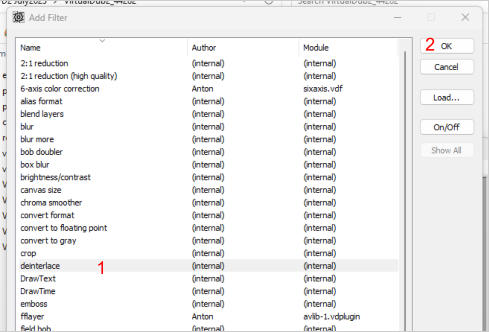
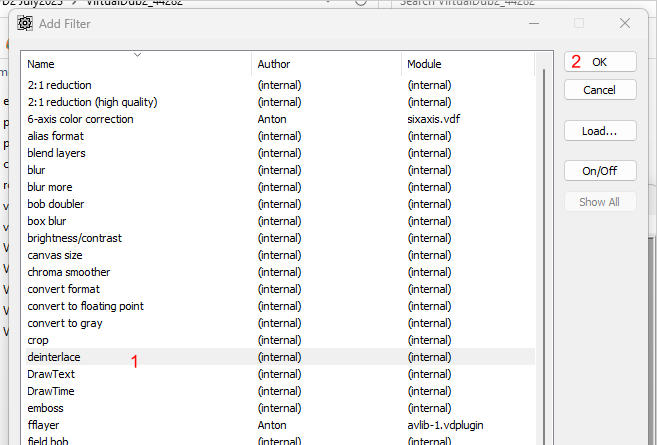
Set up the Deinterlace filter: Video>Filters>Add
Doubleclick deinterlace or single click then OK. The filter options will appear.
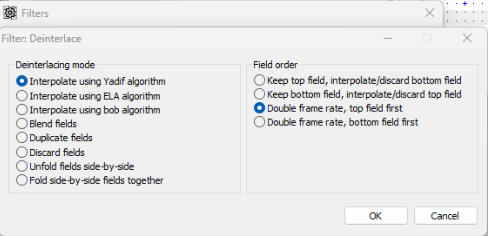
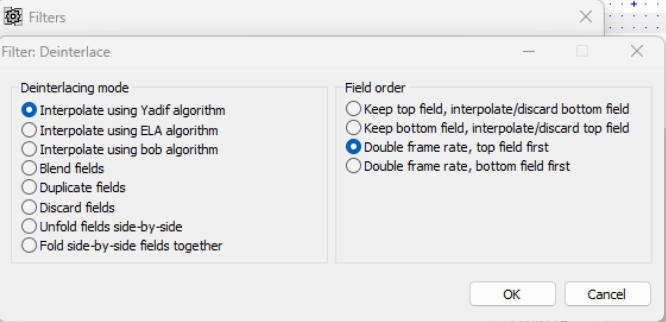
The filter options control panel will open:
Choose the settings as shown; analogue captures are almost always Top Field First. MiniDV/Digital 8 DV video is
bottom field first. This filter setup will convert each (interlaced) field into a frame, so the frame rate will double from
25fps to 50fps. Depending on the source, this will significantly improve the smoothness of any motion.
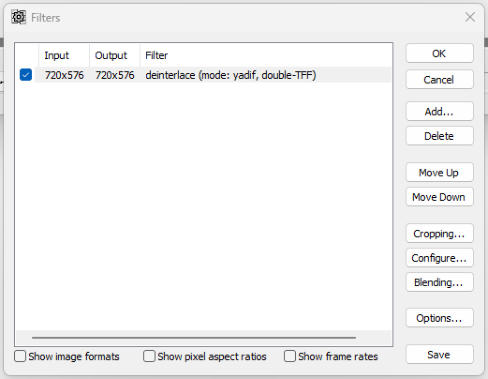
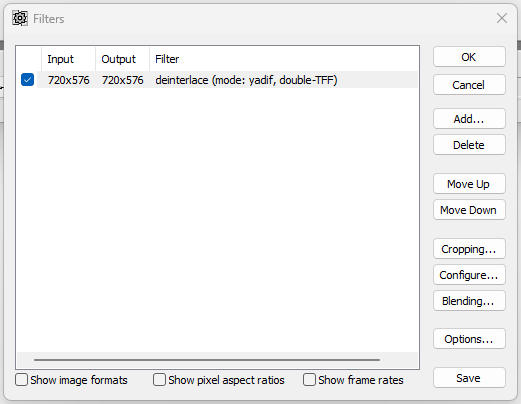
Click OK. The list of loaded filters will be displayed. Note that a filter can be disabled by unticking the box. This is handy
for checking the effect of a filter without the interference of other filters.
You can move filters up and down.
Click OK to return to the main screen. The right pane will show the filtered video.
Noise Reduction
Now let’s add the internal “Temporal Smoother” filter for a bit of noise reduction.
Open the filters box again: Video>Filters>Add
Scroll down to Temporal Smoother, click it, then click OK. The Temporal Smoother control panel opens:
Click on Show preview and a smaller window will open showing the effect. Use the slider to change the strength.
When happy, click OK to return to the main screen and view the result in the right pane.
Note that I’m not suggesting the Temporal Smoother filter is the be-all-and-end-all of noise reduction. This is mainly a
demonstration of how to run the filter system.
Better 3rd party noise reduction filters, (both 32bit, which will require running the 32bit version of VDub), are:
•
Smart Smoother.
•
MSU Denoiser.
FWIW, I use Neat Video for noise reduction and can be used in both 32bit and 64bit versions of VDub. This is a paid
product but is far superior to any filter I have found in Virtual Dub and close to what can be achieved with AVISynth. It is
very easy to use and achieves great results with minimal effort. If you have more than a couple of tapes to do, I would
strongly recommend it. It comes as a Virtual Dub plugin. There are also Neat Video plugins for well-known “proper”
non-linear video editors.
Adding 3rd Party Filters
There are dozens, if not hundreds, of 3rd party filters available, mostly 32bit, that can do all sorts of great things with/to
your video. They come in the form of single files with the VDF extension. Most filters are downloaded in ZIP format; the
ZIP normally also contains information on the filter. For example, from the Smart Smoother link above, the ZIP extracts
to “Smooth.vdf” and “Smooth.txt” which explains the filter.
There are two methods to load 3rd party filters into VDub.
•
Copy the VDF file into the appropriate plugins folder of your VirtualDub2 main folder (Restart VDub after using this
method) or
•
On the Filters dialogue box, click Add>Load… and browse to the filter’s VDF file.
One of my favourite filters is Colormill. It allows adjustment of the black “levels” and is very handy for
adjusting/correcting a video’s colours. There is a Colormill 32 bit version (down the page a bit) and a Colormill 64 bit
version.
The Infognition website is an interesting resource for other Virtual Dub filters.
Cropping
Warning: Deinterlace first, before cropping and resizing. If not deinterlacing first, ensure all crops multiples of 2.
With VDub 2, cropping is done with the Crop filter.
I like to crop/trim off the black side edges and the VHS head switching noise at the bottom of the video.
To preserve the original “shape” of the video, cropping needs in a 4:3 ratio (assuming a 4:3 source, of course): that is,
for every 4 pixels (total) you take off the sides, crop 3 pixels (total) off the top and bottom.
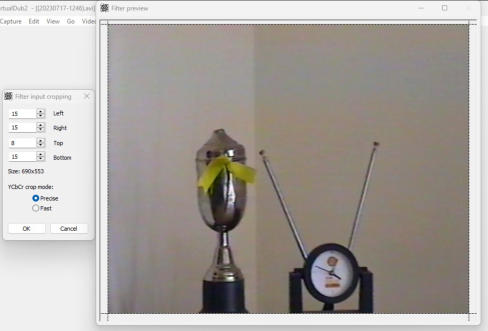
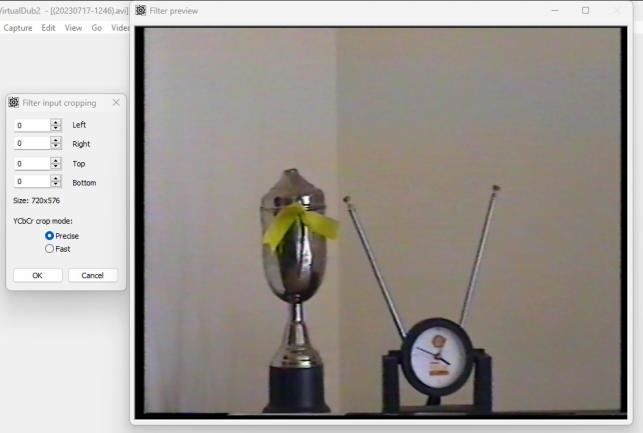
To crop, open the crop filter. In this image, I’ve cropped the black noise bars from all sides. I cropped 30 total from the
sides, but only 17 from the top and bottom. To comply with the 4:3 ratio, I cropped an additional 6 total from the top and
bottom (3 pixels off each), 30:23 being roughly 4:3 or 1.33 to 1.
You may find you have cropped more off the top and bottom than off the sides. In this case, work out the ratio
backwards to calculate how much extra you have to crop off the sides to keep the 4:3 relationship.
An easy way of working out one from the other is to multiply the top and bottom crops by 1.33 to give the required total
side crop. Alternatively, multiply the total side crop by 0.75 to give the required total top and bottom crop.
Actual cropping is done by either using the tumblers or dragging in the edges.
A minor vagary of VDub is that if your crop filter Preview window is too small, you may not be able to see the edges.
Simply left-click-drag the video in the window to expose the edge you want to crop. Alternatively, “maximise” the VDub
window on your desktop.
Here’s the pre-crop image in the crop filter screen:
and after cropping has been applied (I cropped a total of 30 off the sides, so I have to crop a total of 30 x3:4 or 0.75 off
the top and bottom (23). The reason the top and bottom are lopsided is because there was more to crop off the bottom:
Final result:
The apparent uneveness is only a display issue and can be fixed by doing another resize of the panes. The correct
proportions will come in after the resize (next).
Note: For an H264 codec export (ie MP4), each dimension must be an even number ie divisible by 2. For example,
697x431 is bad. 698x432 is good.
Resizing/Upscaling
Warning: Deinterlace first, before cropping and resizing. That requires placing the Deinterlacing filter at the top of the
active filter list, using the Move Up button.
Resizing: All SD video from VCR tapes is 4:3. You may have noticed that 720x576 (PAL) or 720x480 (NTSC) isn’t 4:3,
so if you’re after square pixels (which is what I use) you’ll need to resize your video to 768x576 (PAL) or 640x480
(NTSC).
Upscaling: is where a video is made larger than the standard (768x576 or 640x480) and is optional. There are
arguments all over the Internet about whether videos should be resized or upscaled.
To resize (and/or upscale) your video, use the Resize filter.
Provided you have cropped in proportion, you can resize to PAL 768x576 and NTSC 640x480 or even higher, such as
1440x1080 or 1920x1440, using the Resize filter. The following technique will create a square-pixel video.
For Youtube, if you upload a video of 1440P or greater (eg 1920x1440 [4:3] or 2560x1440 [16:9]), Youtube will encode
the video in the better VP9 codec.
Resizing using this method will only work properly if your crops were made in the 4:3 ratio, as explained above.
Open the Resize filter and set it up like this then click OK (this is for a PAL SD export).
If you wish to export at some other size, simply type in the other resolution eg 1920x1440, ensuring that it matches the
display ratio eg 4:3.
Saving/Exporting your video
Format
AVI is not a good “final” format because the files are huge and many TVs and other devices can’t play them. We need
to export the videos in a user-friendly format. MP4/H264 is a common format with a good quality/size tradeoff that can
be read by every video player out there, including phones.
If you only want to resave your lossless capture (and stay in your capture codec), say after you have trimmed off blank
gaps or unwanted video, then proceed down to the Lossless Saving sections below.
MP4 Export
As far as I am aware, the 1.x versions of VDub do not have any built-in ability to export to MP4.
To export MP4 from VDub2, do this:
Video Menu
Click Full processing mode This allows VDub to re-encode your video into another format eg MP4 (VDub defaults to full
processing mode so this is just a double-check).
Audio Menu
Click Full processing mode. This allows selection of the AAC audio codec.
Click Conversion. Set Sampling Rate to 48,000, Set Precision to 16bit, set Channels to Stereo
File Menu
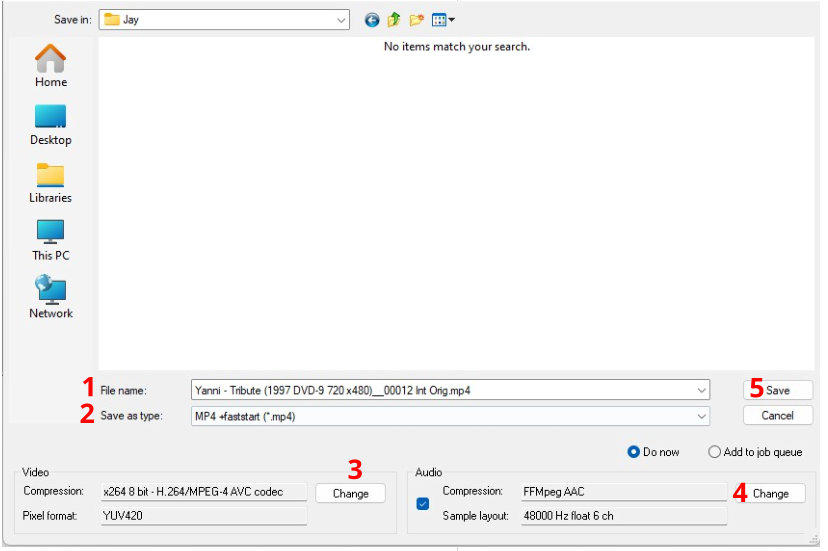
File>Save Video. You’ll get this screen:
Things to do:
File name Insert an appropriate file name.
Save as type From the droplist, choose MP4 Faststart.
Video Compression click Change and click to highlight x264 8 bit:
Click Configure. You’ll get this screen:
Rate control
Set as desired; CRF Rate Factor 18 is a good average value for quality at a reasonable file size but can be
experimented-with to achieve a different file size. The lower the CRF, the higher the quality and file size.
Alternatively, choose Bitrate Based from the droplist to set a specific bitrate.
Sample Aspect Ratio
If your video is already correctly sized eg 1920x1080 (for 16:9), set 1 and 1.
If you resized to 768x576/640x480 as I described above (or another 4:3 resolution), set 1 and 1. This setting applies to
all sizes that have square pixels.
Note: It is possible to export in 4:3 format but with other than the standard frame sizes of 768x576. This requires special
values for the SAR, and is beyond the scope of this tute.
Click OK to return to the Select Video Compression screen (shown two above)
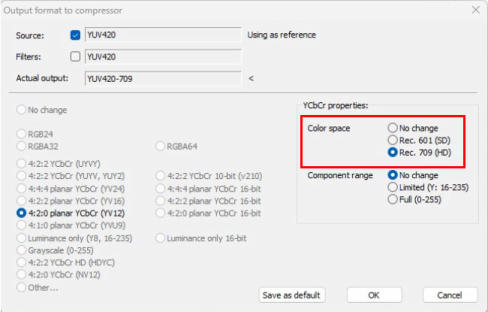
Pixel Format
If your source video is 720 or above in height eg 1920x1080, or you have resized to 720 or above, click on the Pixel
Format button (“3” on the image two-above) and on this screen set the Color Space to Rec. 709:
Click OK twice to get back to the main Save File screen.
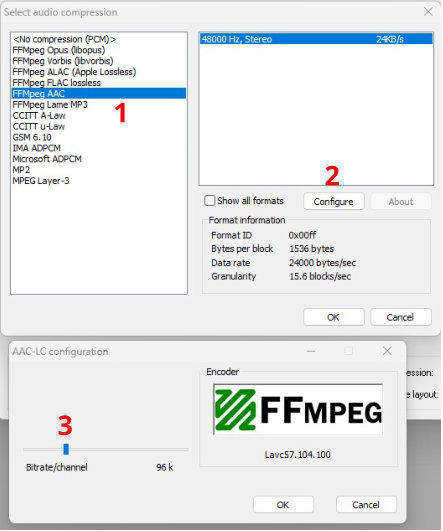
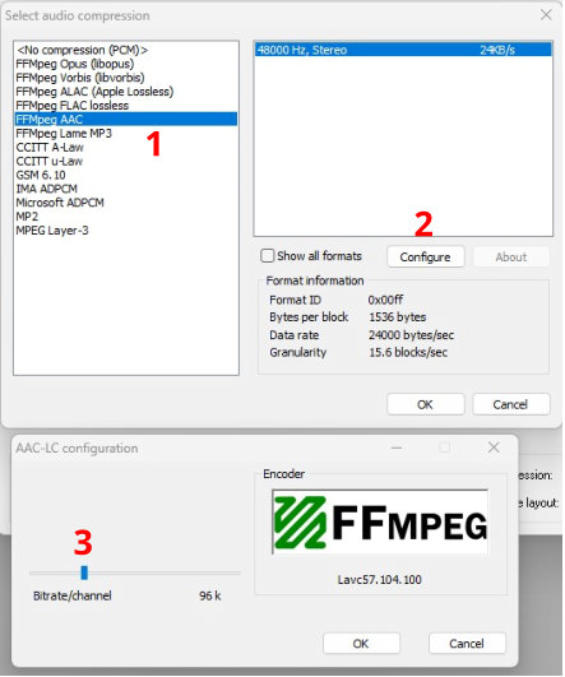
Audio Click Change. You’ll get this screen:
Click on FFMpeg AAC, then on the Configure button and set the slider to 96. This will give 96kb/sec per channel
(192kb/sec total), which is a good all-round value for analogue video. This can be changed if desired.
Click OK to close the audio screen.
Now you’re ready to export/save your video. Click OK and the export will start. A dialogue box will show the encoding
rate and various other parameters. Depending on the filters used and your computer’s horsepower, the export could
take some time.
Lossless Saving-No Filtering
This normally applies only to analogue Lossless AVI files such as those created when capturing.
To losslessly resave your capture after trimming/editing ie no filters applied, do this:
1.
On the Video Menu, choose Direct Stream Copy. This will simply copy your video in the capture codec, not re-
encode it.
2.
File>Save Video. Note that the video compression cannot be changed. Leave the audio as “No
Compression(PCM)”.
3.
Rename your export as required then hit OK.
Lossless Saving-After Filtering
After making changes to your video, such as applying filters, and you want to keep the video in a lossless format, say to
pass to a Non-Linear video editor, you can export to the same or other lossless codec as follows:
1.
On the Video menu, ensure “Full Processing” is ticked.
2.
On the File>Save Video screen, for Video Compression, click Change and ensure (or select) the desired codec is
selected.
3.
For Audio, leave as is (probably PCM).
4.
Change the file name if necessary, then click OK.
Batch Export
A handy export feature is Batch Processing, where you can “queue” export “jobs” and run them all together. This is
great if you have a slower computer and don’t want to wait while each individual export runs. To do this, on the main
Save Video screen, tick the “Add to job queue” radio button, then set up your other exports. When ready to run all the
jobs, File>Job Control>Start.
Saving your settings
Unfortunately, VDub does not prompt you to save any filter settings before it closes, so be careful when you want to exit
if you want to save your processing filters and settings. To do so, use File>Save processing settings. The settings will
be saved in a “vdscript” file, which you can re-use. Simply open your video again (or similar videos), then File>Load
processing settings.


Page links
Virtual Dub
Introduction
This guide does not cover capturing with Virtual
Dub. It covers the basic Virtual Dub 2 editing and
export process from start to finish. The program is
quite capable but I will only touch on the basics
here.
What Is It?
Virtual Dub is a video capture and editing program.
It contains GUI-based video manipulation functions
through it’s use of filters and plugins, some of which
come with the program, and hundreds of others than
can easily be added. VDub can open AVISynth
scripts for further processing. VDub is free. This
version, VDub2, is a variant of the original VDub and
contains some additional user-friendly options such
as simplified cropping, compatibility with many more
file types and H264/MP4 export.
For me, it has fallen out of favour as a capture
program because it is too fiddly and unreliable, but
as an editor, it is a critical part of my workflow, as I
use it to produce high-quality deinterlaced and
filtered AVIs which I then import into my “proper”
video editor for final editing and export.
Virtual Dub will also open AVISynth scripts and with
VDub2 you edit the scripts “on the run” and show
the results immediately.
Installation
VDub doesn’t “ install”, per se. It’s known as a
“portable” program, meaning that it runs in it’s own
folder, which can be placed/located anywhere on
your computer, and which can be moved after
setup/unzipping.
This tute is based on Virtual Dub 2. Download the
ZIP file from here:
https://www.videohelp.com/software/VirtualDub2
Save the ZIP file to whatever location you like.
On the ZIP file, right-click, choose “Extract All…”
and click on “Extract”. The VDub2 folder will be
created inside the folder you downloaded the ZIP
file to. You can move the folder as desired.
Setup
VDub has two versions: the 32bit version and the
64bit version. The 32bit version has quite a number
of filters available that haven’t been adapted for
64bit, such as Flaxen’s VHS filter, an outstanding
32bit filter that can shift bleeding colours in old VHS
video, especially reds. The downside of VDub 32bit
is that it is memory-limited and if you have it doing a
lot, it might run out of memory and crash. I have had
this occur when running AVISynth scripts but not
otherwise. For basic operations, 32bit is OK.
As far as 32/64bit computers go, I don’t know
whether the 64bit version of VDub will run on 32bit
Windows, but the 32bit VDub will definitely run on
64bit Windows.
This is the VDub2 folder:
The two plugins folders contain the plugins and
filters. Third-party plugins and filters can be simply
dropped into the appropriate plugins folder and will
be available in the filters list when the program is
next started.
Note: 32bit filters will not work in the 64bit version,
and vice versa, and won’t be visible in the filter list.
Start the program by double-clicking on the
appropriate EXE file; let’s start with the 32bit
version, VirtualDub.exe. You can tell which version
you have open by looking at Help>About. The 32bit
version says “Compiled for … 2008 for X86” and the
64bit version says “Compiled for … 2008 for
AMD64”.
Once started, open a file; preferably an Interlaced
AVI such as a capture from a tape of some kind so
you can see the effect of the deinterlacing.
Set up the View (menu) arrangement so you have
both panes visible and autosized.
The left pane is the source video. The right pane is
the processed video after the filters have been
applied.
AVISynth Scripts-Opening
For those of you using AVISynth, Virtual Dub 2 is a
great way to open and edit AVISynth scripts (AVS
files). Simply open the AVS with the File>Open
Video file…command.
To edit your script, use Tools>Script Editor. This will
open your script, allow editing, and then you can run
your script again immediately using F5 or on the
script editor menu, File>Save and refresh.
Timeline Editing-The Basics
While not a fully-fledged non-linear video editor,
VDub has good editing capabilities such as trimming
and deleting sections of a video. Basic functions of
the timeline controls:
To export or “Save As” just a portion of the file,
create the blue selection, then File>Save Video.
Here is a short video on using the timeline editing
functions. I made this in a rush for a poster on
VideoHelp so I apologise for the “roughness”.
Lossless Editing
If you merely want to losslessly edit your video files
after capture, for example to cut away unwanted
sections without actually doing any restoration and
then save as lossless, edit as described above, then
proceed down to the Lossless Saving section below.
Using the Filters
Setup
Ensure “Full Processing Mode” is selected
(Video>Full Processing Mode). Video cannot be
modified in Direct Stream Copy mode.
The effects of any filters will be displayed in the right
pane as soon as you hit OK on the main filter
screen. This allows you to compare the pre-
processed video in the left pane with the post-
processed video in the right pane. When you do a
“Save Video…” or other export function, the
exported video will be the same as that in the right
pane.
Deinterlacing
Let’s do a deinterlace and a bit of noise reduction.
Analogue AVIs such as a VHS capture are
interlaced, meaning two fields per frame. This is
displayed as jagged edges on moving objects. This
is quite normal and is removed by the process of
“deinterlacing”.
Deinterlacing should not be applied to a
“progressive” file such as an MP4 from a phone.
Deinterlacing should be the first filter used (if you
are going to use it, that is).
Set up the Deinterlace filter: Video>Filters>Add
Doubleclick deinterlace or single click then OK. The
filter options will appear.
The filter options control panel will open:
Choose the settings as shown; analogue captures
are almost always Top Field First. MiniDV/Digital 8
DV video is bottom field first. This filter setup will
convert each (interlaced) field into a frame, so the
frame rate will double from 25fps to 50fps.
Depending on the source, this will significantly
improve the smoothness of any motion.
Click OK. The list of loaded filters will be displayed.
Note that a filter can be disabled by unticking the
box. This is handy for checking the effect of a filter
without the interference of other filters.
You can move filters up and down.
Click OK to return to the main screen. The right
pane will show the filtered video.
Noise Reduction
Now let’s add the internal “Temporal Smoother” filter
for a bit of noise reduction.
Open the filters box again: Video>Filters>Add
Scroll down to Temporal Smoother, click it, then click
OK. The Temporal Smoother control panel opens:
Click on Show preview and a smaller window will
open showing the effect. Use the slider to change
the strength.
When happy, click OK to return to the main screen
and view the result in the right pane.
Note that I’m not suggesting the Temporal Smoother
filter is the be-all-and-end-all of noise reduction. This
is mainly a demonstration of how to run the filter
system.
Better 3rd party noise reduction filters, (both 32bit,
which will require running the 32bit version of
VDub), are:
•
Smart Smoother.
•
MSU Denoiser.
FWIW, I use Neat Video for noise reduction and can
be used in both 32bit and 64bit versions of VDub.
This is a paid product but is far superior to any filter I
have found in Virtual Dub and close to what can be
achieved with AVISynth. It is very easy to use and
achieves great results with minimal effort. If you
have more than a couple of tapes to do, I would
strongly recommend it. It comes as a Virtual Dub
plugin. There are also Neat Video plugins for well-
known “proper” non-linear video editors.
Adding 3rd Party Filters
There are dozens, if not hundreds, of 3rd party
filters available, mostly 32bit, that can do all sorts of
great things with/to your video. They come in the
form of single files with the VDF extension. Most
filters are downloaded in ZIP format; the ZIP
normally also contains information on the filter. For
example, from the Smart Smoother link above, the
ZIP extracts to “Smooth.vdf” and “Smooth.txt” which
explains the filter.
There are two methods to load 3rd party filters into
VDub.
•
Copy the VDF file into the appropriate plugins
folder of your VirtualDub2 main folder (Restart
VDub after using this method) or
•
On the Filters dialogue box, click Add>Load…
and browse to the filter’s VDF file.
One of my favourite filters is Colormill. It allows
adjustment of the black “levels” and is very handy
for adjusting/correcting a video’s colours. There is a
Colormill 32 bit version (down the page a bit) and a
Colormill 64 bit version.
The Infognition website is an interesting resource for
other Virtual Dub filters.
Cropping
Warning: Deinterlace first, before cropping and
resizing. If not deinterlacing first, ensure all crops
multiples of 2.
With VDub 2, cropping is done with the Crop filter.
I like to crop/trim off the black side edges and the
VHS head switching noise at the bottom of the
video.
To preserve the original “shape” of the video,
cropping needs in a 4:3 ratio (assuming a 4:3
source, of course): that is, for every 4 pixels (total)
you take off the sides, crop 3 pixels (total) off the top
and bottom.
To crop, open the crop filter. In this image, I’ve
cropped the black noise bars from all sides. I
cropped 30 total from the sides, but only 17 from the
top and bottom. To comply with the 4:3 ratio, I
cropped an additional 6 total from the top and
bottom (3 pixels off each), 30:23 being roughly 4:3
or 1.33 to 1.
You may find you have cropped more off the top and
bottom than off the sides. In this case, work out the
ratio backwards to calculate how much extra you
have to crop off the sides to keep the 4:3
relationship.
An easy way of working out one from the other is to
multiply the top and bottom crops by 1.33 to give the
required total side crop. Alternatively, multiply the
total side crop by 0.75 to give the required total top
and bottom crop.
Actual cropping is done by either using the tumblers
or dragging in the edges.
A minor vagary of VDub is that if your crop filter
Preview window is too small, you may not be able to
see the edges. Simply left-click-drag the video in the
window to expose the edge you want to crop.
Alternatively, “maximise” the VDub window on your
desktop.
Here’s the pre-crop image in the crop filter screen:
and after cropping has been applied (I cropped a
total of 30 off the sides, so I have to crop a total of
30 x3:4 or 0.75 off the top and bottom (23). The
reason the top and bottom are lopsided is because
there was more to crop off the bottom:
Final result:
The apparent uneveness is only a display issue and
can be fixed by doing another resize of the panes.
The correct proportions will come in after the resize
(next).
Note: For an H264 codec export (ie MP4), each
dimension must be an even number ie divisible by 2.
For example, 697x431 is bad. 698x432 is good.
Resizing/Upscaling
Warning: Deinterlace first, before cropping and
resizing. That requires placing the Deinterlacing
filter at the top of the active filter list, using the Move
Up button.
Resizing: All SD video from VCR tapes is 4:3. You
may have noticed that 720x576 (PAL) or 720x480
(NTSC) isn’t 4:3, so if you’re after square pixels
(which is what I use) you’ll need to resize your video
to 768x576 (PAL) or 640x480 (NTSC).
Upscaling: is where a video is made larger than the
standard (768x576 or 640x480) and is optional.
There are arguments all over the Internet about
whether videos should be resized or upscaled.
To resize (and/or upscale) your video, use the
Resize filter.
Provided you have cropped in proportion, you can
resize to PAL 768x576 and NTSC 640x480 or even
higher, such as 1440x1080 or 1920x1440, using the
Resize filter. The following technique will create a
square-pixel video.
For Youtube, if you upload a video of 1440P or
greater (eg 1920x1440 [4:3] or 2560x1440 [16:9]),
Youtube will encode the video in the better VP9
codec.
Resizing using this method will only work properly if
your crops were made in the 4:3 ratio, as explained
above.
Open the Resize filter and set it up like this then
click OK (this is for a PAL SD export).
If you wish to export at some other size, simply type
in the other resolution eg 1920x1440, ensuring that
it matches the display ratio eg 4:3.
Saving/Exporting your video
Format
AVI is not a good “final” format because the files are
huge and many TVs and other devices can’t play
them. We need to export the videos in a user-
friendly format. MP4/H264 is a common format with
a good quality/size tradeoff that can be read by
every video player out there, including phones.
If you only want to resave your lossless capture
(and stay in your capture codec), say after you have
trimmed off blank gaps or unwanted video, then
proceed down to the Lossless Saving sections
below.
MP4 Export
As far as I am aware, the 1.x versions of VDub do
not have any built-in ability to export to MP4.
To export MP4 from VDub2, do this:
Video Menu
Click Full processing mode This allows VDub to re-
encode your video into another format eg MP4
(VDub defaults to full processing mode so this is just
a double-check).
Audio Menu
Click Full processing mode. This allows selection of
the AAC audio codec.
Click Conversion. Set Sampling Rate to 48,000, Set
Precision to 16bit, set Channels to Stereo
File Menu
File>Save Video. You’ll get this screen:
Things to do:
File name Insert an appropriate file name.
Save as type From the droplist, choose MP4
Faststart.
Video Compression click Change and click to
highlight x264 8 bit:
Click Configure. You’ll get this screen:
Rate control
Set as desired; CRF Rate Factor 18 is a good
average value for quality at a reasonable file size
but can be experimented-with to achieve a different
file size. The lower the CRF, the higher the quality
and file size.
Alternatively, choose Bitrate Based from the droplist
to set a specific bitrate.
Sample Aspect Ratio
If your video is already correctly sized eg
1920x1080 (for 16:9), set 1 and 1.
If you resized to 768x576/640x480 as I described
above (or another 4:3 resolution), set 1 and 1. This
setting applies to all sizes that have square pixels.
Note: It is possible to export in 4:3 format but with
other than the standard frame sizes of 768x576.
This requires special values for the SAR, and is
beyond the scope of this tute.
Click OK to return to the Select Video Compression
screen (shown two above)
Pixel Format
If your source video is 720 or above in height eg
1920x1080, or you have resized to 720 or above,
click on the Pixel Format button (“3” on the image
two-above) and on this screen set the Color Space
to Rec. 709:
Click OK twice to get back to the main Save File
screen.
Audio Click Change. You’ll get this screen:
Click on FFMpeg AAC, then on the Configure button
and set the slider to 96. This will give 96kb/sec per
channel (192kb/sec total), which is a good all-round
value for analogue video. This can be changed if
desired.
Click OK to close the audio screen.
Now you’re ready to export/save your video. Click
OK and the export will start. A dialogue box will
show the encoding rate and various other
parameters. Depending on the filters used and your
computer’s horsepower, the export could take some
time.
Lossless Saving-No Filtering
This normally applies only to analogue Lossless AVI
files such as those created when capturing.
To losslessly resave your capture after
trimming/editing ie no filters applied, do this:
1.
On the Video Menu, choose Direct Stream Copy.
This will simply copy your video in the capture
codec, not re-encode it.
2.
File>Save Video. Note that the video
compression cannot be changed. Leave the
audio as “No Compression(PCM)”.
3.
Rename your export as required then hit OK.
Lossless Saving-After Filtering
After making changes to your video, such as
applying filters, and you want to keep the video in a
lossless format, say to pass to a Non-Linear video
editor, you can export to the same or other lossless
codec as follows:
1.
On the Video menu, ensure “Full Processing” is
ticked.
2.
On the File>Save Video screen, for Video
Compression, click Change and ensure (or
select) the desired codec is selected.
3.
For Audio, leave as is (probably PCM).
4.
Change the file name if necessary, then click
OK.
Batch Export
A handy export feature is Batch Processing, where
you can “queue” export “jobs” and run them all
together. This is great if you have a slower computer
and don’t want to wait while each individual export
runs. To do this, on the main Save Video screen, tick
the “Add to job queue” radio button, then set up your
other exports. When ready to run all the jobs,
File>Job Control>Start.
Saving your settings
Unfortunately, VDub does not prompt you to save
any filter settings before it closes, so be careful
when you want to exit if you want to save your
processing filters and settings. To do so, use
File>Save processing settings. The settings will be
saved in a “vdscript” file, which you can re-use.
Simply open your video again (or similar videos),
then File>Load processing settings.