HDVSplit
Introduction
What Is HDVSplit For
HDVSplit is used for capturing “High Definition” video (HDV) from an HDV camcorder (such as the HV series of Canon
camcorders) using the IEEE1394 Firewire cabling/transfer system. It can’t be used to capture/transfer standard
definition DV. This means that the video, which is stored digitally on the tape, is simply transferred to the computer, and
not digitally converted on the way. This method retains the original quality.
Your computer must have a Firewire/IEEE1394 port, and the Firewire port and camera must be visible to Windows.
Windows 10 may require some extra setup to recognise the Firewire port. Please refer to the DV Transfer Info section
of this site for more information on this.
Why Use HDVSplit
Most video editing programs can capture HDV directly, without using a third-party program such as HDVSplit. However,
they may not capture the files with a user-friendly name eg with date and time of each shot/scene. HDVSplit does this: it
will capture each scene so that future manipulation and cataloguing of the files is easy. For example, I have all my video
scenes/clips named in date_time format in dated folders so I can instantly go to a event, or alternatively, I can see all
the files from a particular event together.
These instructions have been developed using a Canon HV20.
HDVSplit will produce M2T files. The files are actually high definition (16:9 1440x1080i) files in the MPEG 2 format and
can be played by most third-party players such as VLC player, and imported into most good video editors. To play the
files in Windows Media Player, the MPEG 2 codec for WMP will need to be installed.
Setup
Installation
HDVSplit on VideoHelp
Download the Zip file into a folder of your choice, then unzip it by right-clicking and choosing “Extract All…, then
“Extract”. Windows will extract the files from the zip into a folder. Open that folder to get access to the EXE file.
HDVSplit does not install; it runs in Portable mode.
Camera Setup
The camera must be in HDV mode. For the Canon HV series, with the main switch in Play, the playback mode is
displayed at the top of the screen: DV/A/HDV. HDV must be displayed. If not, press the FUNC button, select Menu and
press, then select PLAY OUT/SETUP1 and press, then change the PLAYBACK STD to HDV and press. Press the
FUNC button to exit.
Ensure the Firewire cable is firmly and securely plugged in the computer’s Firewire port. HV series camcorders have
been irreversibly damaged by short circuits caused by incorrectly fitted Firewire cables.
Opening HDVSplit
1.
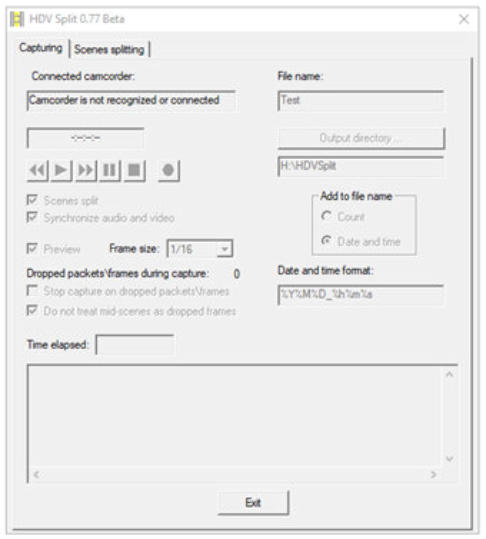
It is best to run HDVSplit as an Administrator. Right-click on the EXE file, then choose “Run as administrator” then
click OK. The HDVSplit screen will display:
Note that most boxes are greyed out.
2.
With the camcorder switched off, plug in your Firewire cable.
3.
When the Firewire cable is plugged into the computer and the camcorder, switch the camcorder on to Play mode.
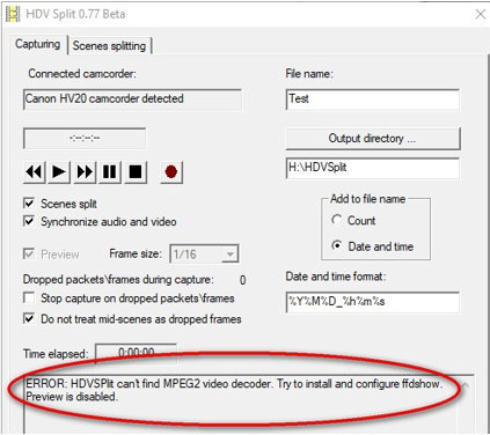
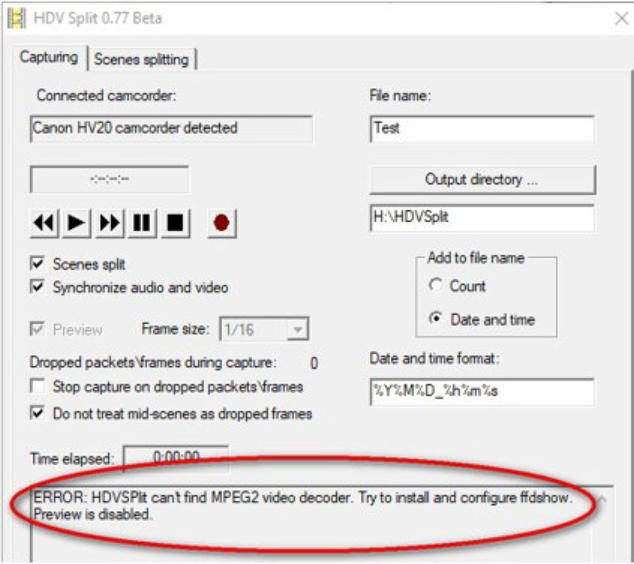
All boxes in HDVSplit will come alive and “XXXX detected” will appear in the Connected Camcorder field:
Do not be alarmed about the error message. The preview function is not needed for HDVSplit to capture video. I have
explained the preview function at the end of this guide.
Set up Capture Folder and Filenames
•
Capture Folder: click the “Output Directory…” button to set the desired folder for saving your videos.
•
Set the filename as desired. Whatever is put into the “File name:” box will be appended to the front of whatever is
in the “date and Time format:” box. For example, in the case above, the first file captured would be named
“Test20210610_102800” or whatever date and time the video was actually shot.
Another example could be: in the Filename box, put 2021, and in the Date and Time format box put %M%D_%h%m%s.
The result would be a file name of “20210610_102800”.
Subsequent filenames will be different because of the later time that the subsequent clips were taken.
Capture
Preview
If an MPEG 2 decoder has been installed, the camera/tape position can viewed in the Preview window. If an MPEG 2
decoder is not installed, no preview window will be shown but control of the tape position is still available using the
HDVSplit controls. To enable the Preview window, FFDShow will need to be installed. Directions for doing so follow
later.
Starting Capture
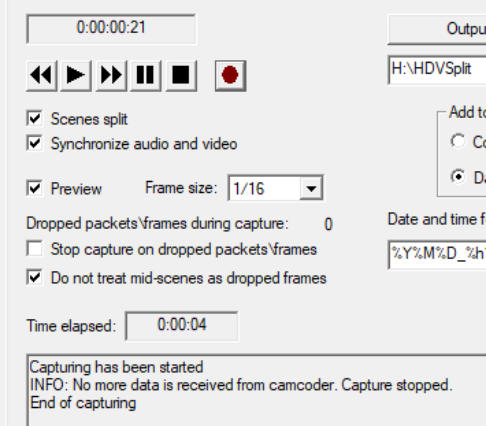
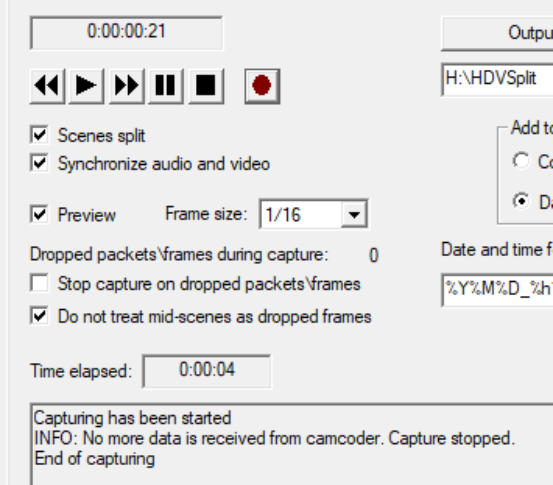
When ready to capture, simply click the red button.
Note: For the HV20, if the tape is fully rewound when capture is started, the first attempt will probably fail. If it does, wait
a few seconds until the red button becomes active again, and then start recording again. It appears that HDVSplit won’t
tolerate a “no signal” during the time that the HV20 starts up with the tape at position Zero. After the tape is a few
seconds in from the zero position, HDVSplit will be happy and will commence recording on the second attempt.
Ending Capture
When desired, capture can be ended by clicking the square Stop button.
Your videos have now been “transferred” in original quality to your PC for viewing and editing (if desired).
Installing FFDShow
Introduction
To enable HDVSplit’s preview window/function, an MPEG 2 video decoder has to be installed. If audio preview is
desired, an audio decoder is also needed. This is achieved by installing FFDShow. This preview function is not required
for HDVSplit to function, and it will happily capture HDV video without it, but having it does have advantages, for
example in my case my HV20 screen has died so I use the HDVSplit preview to view the tape.
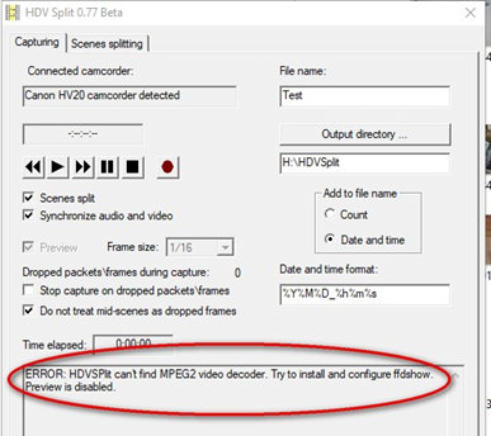
If you don’t have any message about video or audio decoders in the box at the bottom of HDVSplit, you’re all set to go.
If you do, such as the one shown here, and you want the preview screen functionality, you will need to install FFDShow
to activate the MPEG 2 video decoder and the MP1 and 2 audio decoder.
Installing and setting up FFDShow
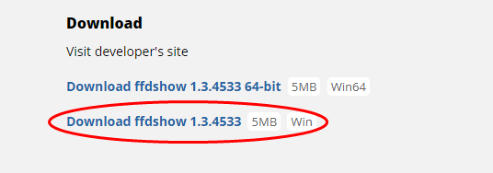
Download FFDShow from the VideoHelp website here. Choose the non “64 bit” file.
When you have downloaded the EXE file, run it to install FFDShow.
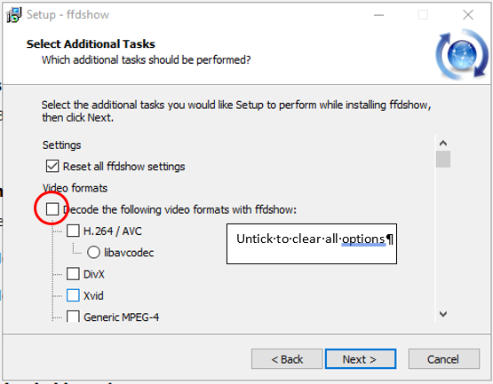
Proceed through the installation, accepting all default options, until you get to this screen:
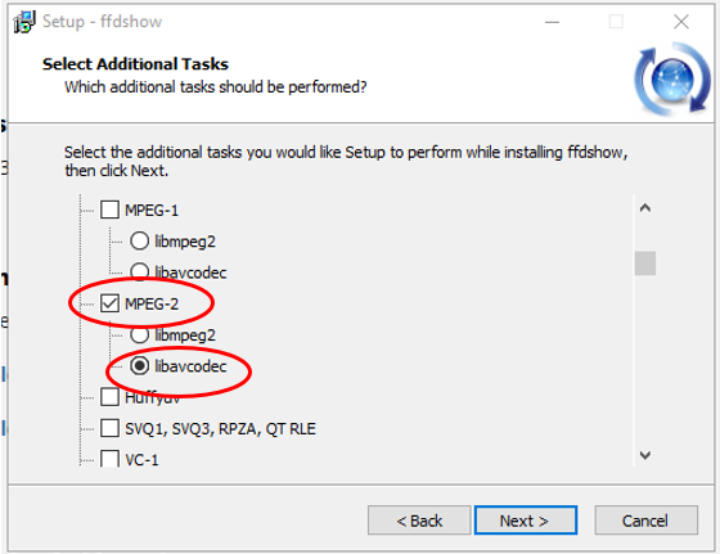
Under Video formats, untick the square box Untick the square box to deselect all options.
Next, scroll down the list of video formats to the MPEG section and tick the box, and choose libavcodec:
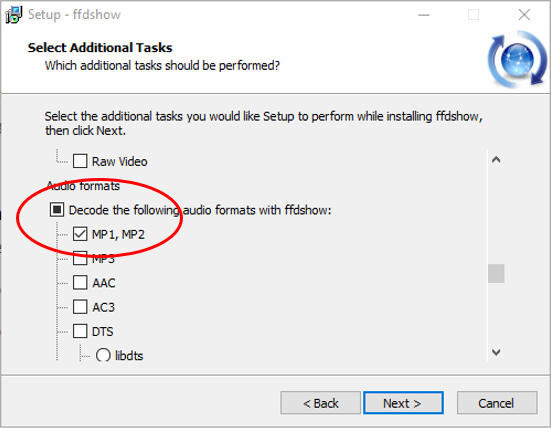
Continue scrolling down to the audio section and do the same: deselect the square audio box to deselect all the
options, then tick MP1, MP2:
That’s it. Click Next until the installation finishes.
The above settings in FFDShow can be changed by accessing the FFDShow video decoder config, or the audio
decoder config, from the FFDShow program group icon on your Start menu.
When you next start HDVSplit, the video and audio error messages will be cleared and the blank Preview window will
appear.


HDVSplit
Introduction
What Is HDVSplit For
HDVSplit is used for capturing “High Definition”
video (HDV) from an HDV camcorder (such as the
HV series of Canon camcorders) using the
IEEE1394 Firewire cabling/transfer system. It can’t
be used to capture/transfer standard definition DV.
This means that the video, which is stored digitally
on the tape, is simply transferred to the computer,
and not digitally converted on the way. This method
retains the original quality.
Your computer must have a Firewire/IEEE1394 port,
and the Firewire port and camera must be visible to
Windows. Windows 10 may require some extra
setup to recognise the Firewire port. Please refer to
the DV Transfer Info section of this site for more
information on this.
Why Use HDVSplit
Most video editing programs can capture HDV
directly, without using a third-party program such as
HDVSplit. However, they may not capture the files
with a user-friendly name eg with date and time of
each shot/scene. HDVSplit does this: it will capture
each scene so that future manipulation and
cataloguing of the files is easy. For example, I have
all my video scenes/clips named in date_time format
in dated folders so I can instantly go to a event, or
alternatively, I can see all the files from a particular
event together.
These instructions have been developed using a
Canon HV20.
HDVSplit will produce M2T files. The files are
actually high definition (16:9 1440x1080i) files in the
MPEG 2 format and can be played by most third-
party players such as VLC player, and imported into
most good video editors. To play the files in Windows
Media Player, the MPEG 2 codec for WMP will need
to be installed.
Setup
Installation
HDVSplit on VideoHelp
Download the Zip file into a folder of your choice,
then unzip it by right-clicking and choosing “Extract
All…, then “Extract”. Windows will extract the files
from the zip into a folder. Open that folder to get
access to the EXE file.
HDVSplit does not install; it runs in Portable mode.
Camera Setup
The camera must be in HDV mode. For the Canon
HV series, with the main switch in Play, the playback
mode is displayed at the top of the screen:
DV/A/HDV. HDV must be displayed. If not, press the
FUNC button, select Menu and press, then select
PLAY OUT/SETUP1 and press, then change the
PLAYBACK STD to HDV and press. Press the
FUNC button to exit.
Ensure the Firewire cable is firmly and securely
plugged in the computer’s Firewire port. HV series
camcorders have been irreversibly damaged by
short circuits caused by incorrectly fitted Firewire
cables.
Opening HDVSplit
1.
It is best to run HDVSplit as an Administrator.
Right-click on the EXE file, then choose “Run as
administrator” then click OK. The HDVSplit screen
will display:
Note that most boxes are greyed out.
2.
With the camcorder switched off, plug in your
Firewire cable.
3.
When the Firewire cable is plugged into the
computer and the camcorder, switch the camcorder
on to Play mode. All boxes in HDVSplit will come
alive and “XXXX detected” will appear in the
Connected Camcorder field:
Do not be alarmed about the error message. The
preview function is not needed for HDVSplit to
capture video. I have explained the preview function
at the end of this guide.
Set up Capture Folder and Filenames
•
Capture Folder: click the “Output Directory…”
button to set the desired folder for saving your
videos.
•
Set the filename as desired. Whatever is put into
the “File name:” box will be appended to the front of
whatever is in the “date and Time format:” box. For
example, in the case above, the first file captured
would be named “Test20210610_102800” or
whatever date and time the video was actually shot.
Another example could be: in the Filename box, put
2021, and in the Date and Time format box put
%M%D_%h%m%s. The result would be a file name
of “20210610_102800”.
Subsequent filenames will be different because of
the later time that the subsequent clips were taken.
Capture
Preview
If an MPEG 2 decoder has been installed, the
camera/tape position can viewed in the Preview
window. If an MPEG 2 decoder is not installed, no
preview window will be shown but control of the tape
position is still available using the HDVSplit controls.
To enable the Preview window, FFDShow will need
to be installed. Directions for doing so follow later.
Starting Capture
When ready to capture, simply click the red button.
Note: For the HV20, if the tape is fully rewound when
capture is started, the first attempt will probably fail.
If it does, wait a few seconds until the red button
becomes active again, and then start recording
again. It appears that HDVSplit won’t tolerate a “no
signal” during the time that the HV20 starts up with
the tape at position Zero. After the tape is a few
seconds in from the zero position, HDVSplit will be
happy and will commence recording on the second
attempt.
Ending Capture
When desired, capture can be ended by clicking the
square Stop button.
Your videos have now been “transferred” in original
quality to your PC for viewing and editing (if desired).
Installing FFDShow
Introduction
To enable HDVSplit’s preview window/function, an
MPEG 2 video decoder has to be installed. If audio
preview is desired, an audio decoder is also needed.
This is achieved by installing FFDShow. This
preview function is not required for HDVSplit to
function, and it will happily capture HDV video
without it, but having it does have advantages, for
example in my case my HV20 screen has died so I
use the HDVSplit preview to view the tape.
If you don’t have any message about video or audio
decoders in the box at the bottom of HDVSplit,
you’re all set to go.
If you do, such as the one shown here, and you want
the preview screen functionality, you will need to
install FFDShow to activate the MPEG 2 video
decoder and the MP1 and 2 audio decoder.
Installing and setting up FFDShow
Download FFDShow from the VideoHelp website
here. Choose the non “64 bit” file.
When you have downloaded the EXE file, run it to
install FFDShow.
Proceed through the installation, accepting all
default options, until you get to this screen:
Under Video formats, untick the square box Untick
the square box to deselect all options.
Next, scroll down the list of video formats to the
MPEG section and tick the box, and choose
libavcodec:
Continue scrolling down to the audio section and do
the same: deselect the square audio box to deselect
all the options, then tick MP1, MP2:
That’s it. Click Next until the installation finishes.
The above settings in FFDShow can be changed by
accessing the FFDShow video decoder config, or
the audio decoder config, from the FFDShow
program group icon on your Start menu.
When you next start HDVSplit, the video and audio
error messages will be cleared and the blank
Preview window will appear.